


JS增强
概述
JS 增强主要包含列表和表单的 JS 增强, 按执行时机大概分为两类
- 列表和表单页面中一些关键节点事件, 自动执行
- 系统按钮和自定义按钮点击事件, 点击某个按钮时执行
JS 增强的实现位置
- 列表的 JS 增强都在
src/views/modules/online/cgform/auto/OnlineList.vue文件中, 可以通过搜索cgButtonJsHandler、cgButtonLinkHandler、来查找 - 表单的 JS 增强都在
src/views/modules/online/cgform/auto/OnlineForm.vue文件中,可以通过搜索cgButtonJsHandler、cgButtonJsHandler来查找
备注
- 所有的 JS 增强参数第一个都是
that,也就是 this,执行上下文是列表或者表单组件 - 多个 JS 增强之间需要用逗号隔开, JS 增强定义后实际被转换为一个对象
{ created(){},beforeLoadData(){}}
列表 JS 增强
created(that)
列表最先执行的函数, 只会执行一次, 在 getColumns 接口成功后执行(JS 增强内容在这个接口中返回), 参数无
created(that){
  console.log("列表页面创建了")
}
onInitQueryParams(that,params)
初始化列表查询项时执行, 参数为查询项, 可以在这里面修改params参数,或者返回一个对象,作为默认查询项,可以为 async 函数
onInitQueryParams(that,params){
	params.fd_name="张三";
  params.fd_age=22;
  params.fd_sex='1'
},
onResetQueryParams(that,params){
	params.fd_name="李四";
  params.fd_age=33;
  params.fd_sex='2'
}
onResetQueryParams(that,params)
点击查询项重置按钮时执行, 参数为重置后的查询项, 可以在这里面修改params参数,或者返回一个对象,强制修改查询项,可以为 async 函数
onInitQueryParams(that,params){
	params.fd_name="张三";
  params.fd_age=22;
  params.fd_sex='1'
},
onResetQueryParams(that,params){
	params.fd_name="李四";
  params.fd_age=33;
  params.fd_sex='2'
}
beforeLoadData(that,params)
列表调用接口加载数据前会执行, 参数为查询项, 可以在函数内部修改查询项参数
beforeLoadData(that,params){
  params.name = 'test'

  return params; // 这个return 可以返回一个新的对象, 也可以直接内部修改 params,省略返回值
  // return { ...params, name: 'test' }
}
afterLoadData(that,dataSource)
列表调用接口加载数据后会执行, 参数为列表数据和查询项, 可以修改 dataSource 或者返回一个数组,来替换列表数据,可以为 async 函数
async afterLoadData(that,dataSource,params){

  console.log("当前查询项以及对应的数据为:",params,dataSource);

	return [{fd_name: '张三', fd_age:22, fd_sex:'1'}, {fd_name: '李四', fd_age:33, fd_sex:'2'}]
}
afterSave(that,formData)
列表打开表单并在表单保存成功后会执行, 参数为提交的表单数据
afterSave(that,formData){
  console.log("提交的数据:",formData,formData.id)
}
onSelectRow(that,selectionRows)
列表行选中时会执行, 参数为选中的数据, 是一个数组, 可以返回一个 id 数组如:[id1,id2],覆盖选中的行为
onSelectRow(that,selectionRows){
  // 过滤选中的数据中状态为2的
  return selectionRows.filter(v=>v.fd_status !== 2).map(v=>v.id);
}
自定义按钮函数
对于类型为 JS 和 JSAndAction 的自定义按钮点击时会触发, 对应的 JS 增强名称和按钮的 code 一致
beforeAdd(that)
点击列表上方添加按钮时会执行,函数可以为一个 async 函数, 参数无, 可以 return false 或者 throw new Error 来阻止默认行为(打开新增表单),
下面的几个 JS 增强方法都和这个一样
// 可以为async函数,当需要发请求时
async beforeAdd(that){

  //  openCustomModal   自己打开一个表单弹窗,或者自己写的页面

  // that.$message.error("不让你打开新增表单");
  return false; // 阻止默认行为

  // 可以返回一个对象,用来填充表单默认值
  // return {
  //   fd_parent:22
  // }
}
beforeEdit(that,record)
点击列表右侧编辑按钮时会执行,函数可以为一个 async 函数,参数为对应行的数据, 可以 return false 或者 throw new Error 来阻止默认行为(打开编辑表单)
beforeDetail(that,record)
点击列表右侧详情按钮时会执行,函数可以为一个 async 函数,参数为对应行的数据, 可以 return false 或者 throw new Error 来阻止默认行为(打开详情表单)
beforeDelete(that,record)
点击列表右侧删除按钮时会执行,函数可以为一个 async 函数,参数为对应行的数据, 可以 return false 或者 throw new Error 来阻止默认行为(删除数据)
beforeBatchDelete(that,records)
点击列表上方批量删除按钮时会执行,函数可以为一个 async 函数,参数为选中的行的数据,数组类型, 可以 return false 或者 throw new Error 来阻止默认行为(删除数据)
beforeImport(that,importUrl)
点击导入按钮时会触发, 参数为导入 url
beforeExport(that,{url, params})
点击导出按钮执行的函数, 参数为导出 url 和查询项, 可以 return false 来阻止导出,并手动调用接口自定义导出数据, 或者返回一个对象,来自定义导出接口地址和参数
beforeExport(that,{url, params}){
  console.log("导出参数:",url,params);

  return false; // 阻止默认导出

  return {
    url:'/api/export', // 自定义到处接口
    params: { ...params, fd_name: 'test' } // 自定义导出参数
  }
}
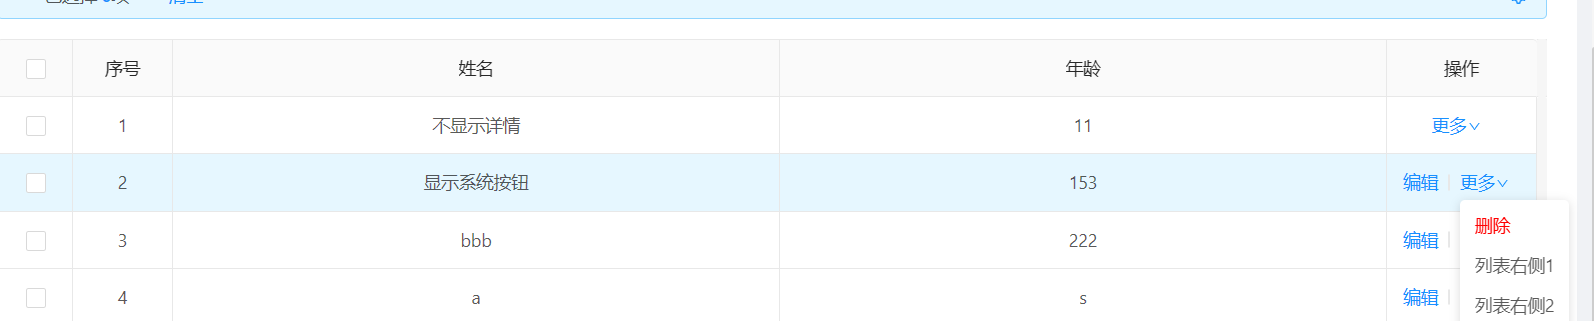
beforeRenderRowButton(that,{ record, btns, index })
新增的, 在列表渲染每行操作列按钮时, 通过 JS 增强可以让每行的按钮显示都不相同, 参数为当前行的数据, 按钮列表, 当前行的索引. 注意:这个执行会比较频繁, 不支持 async, 书写步骤可能会比较麻烦. 可以的话还是通过按钮表达式来修改按钮显示
// btns 中的各个key
// list-more  更多按钮
// list-detail 详情按钮
// list-update 编辑按钮
// list-remove 删除按钮

beforeRenderRowButton(that, {record, index, btns} ){
  const curUser = that.$store.getters.username; // 获取系统登陆人用户名
  // console.log("渲染按钮:", record,index,btns);

  if(index === 0 && curUser === 'admin'){ // 对于第一行数据,如果是admin,隐藏编辑按钮
  	return btns.filter(v=>v.key !=='list-update');
  } else if(index === 1){ // 对于第一个数据, 隐藏更多里面的详情按钮
    const moreBtnIndex = btns.findIndex(v=>v.key === 'list-more');
    if(moreBtnIndex === -1) return btns;
    const childrenNoDetail = btns[moreBtnIndex].children.filter(v=>v.key !== 'list-detail');
   	btns[moreBtnIndex].children = childrenNoDetail;
    return btns;
  }
	return btns;
}
效果查看
表单 JS 增强
setFormItem(that,schema,{id,code})
表单最先执行的函数,在 loadFormItem 接口返回后会执行,可以为 async 函数,参数 1 为 schema,参数 2 为一个对象,有 id 和 code 值. 可以在函数内部修改 properties 属性,比如根据表 id 通过接口强制修改某个 select 的 options
loadData(that,{id,type})
在编辑和详情获取数据时执行, 可以为 async 函数, 参数为一个对象{id:“表单 ID”,type:“当前是编辑还是详情”}, 可以通过 return 一个 object 来阻止发送请求并将值赋值给表单
  async beforeLoadData(that,{id,type}){

    // 如果是编辑就强制修改返回的数据
    // const result = await getAction('/api/xxx');
    if(type === 'edit'){
      return {
        id:123,
        fd_name:'test'
      }
    }
  }
loaded(that,{data,type})
表单显示出来并且给表单赋完值后执行, 参数 data:为接口返回的表单数据. 参数 type:为新增 add/编辑 edit/详情 detail. 对于一些初始化的, 常规的逻辑都可以在这个函数里面执行
loaded(that, {data, type}){
	console.log("表单页面加载完毕:",data,type);
}
show(that)
和 loaded 函数基本一致(之前的表单包含模态框组件,是在模态框出现时执行), 稍微在 loaded 之前执行, 参数无
onTabChange(that,tabKey)
在表单有关联表或者分组字段时候, 切换 tab 页时执行, 刚加载完展示第一个 tab 页时也会执行一次, 参数为当前 tab 页签的 KEY, 对于关联表,KEY 就是关联表表名, 对于分组字段,规则为group_+当前 tab 页顺序,从 0 开始
onTabChange(that,tabKey){
  // 如果切换到某个关联表, 就刷新那个关联表的数据
  if(tabKey === 'linktable_aa'){
    that.$nextTick(()=>{
      that.$refs.linktable_aa.loadData()
    })
  }
}
beforeSubmit(that,formData)
在表单提交前执行,可以为 async 函数,参数为准备提交的表单数据, 可以通过 throw new Error 来阻止表单提交,也可以修改表单提交数据,
async beforeSubmit(that,formData){
  //  状态为1提交前发送个请求, 状态为2不让提交
  if(formData.fd_status === 1){
    await postAction("/aasdad");
  } else if(formData.fd_status === 2){
    throw new Error("状态为2不能提交")
  }
}
onValidateFailed(that,err)
在表单校验失败后执行,参数为 Error 对象, 可以返回一个新的 Error 对象来修改错误提示信息
onValidateFailed(that,err){
 console.log("表单校验失败了:",err);

  return new Error("自定义校验失败提示信息")
}
afterSubmit(that,formData)
在表单提交成功后提示信息出现前执行, 可以为 async 函数, 参数为提交给后台的数据+表单 id, 可以 throw new Error 来阻止后面的提示信息和模态框关闭行为
async afterSubmit(that,formData){
  //  状态为1提交前发送个请求, 状态为2不让提交
  console.log("提交完数据了,在发送个请求")
  await postAction("/asdad",{id:formData.id, name:'adada'});
}
JS 增强最佳实践
列表或表单中打开一个 online 或者自定义组件弹窗
列表中获取当前选中的数据
listBtn1(that){
  // 获取选中的数据数组
	const selectedRows = that.table.selectionRows;
  // 只获取选中的数据的ID数组
  const selectedRowKeys1 = that.table.selectedRowKeys;
  // 从选中的数据中获取ID数组 和 selectedRowKeys1 是一样的
  const selectedRowKeys2 = selectedRows.map(v=>v.id);

  console.log("当前选中的数据:",selectedRowKeys1,selectedRowKeys2,selectedRows);
},
访问当前页面的路由查询项
created(that){
  console.log("当前页面路由:",that.$route.params.code);
}
隐藏列表某个按钮
给 that.hiddenButtons 数组添加对应按钮的 key 来隐藏 对应按钮 KEY
created(that){

  // 新增add 编辑update 详情detail 删除delete 导入import 导出export 高级查询super_query 批量删除batch_delete

  that.hiddenButtons = [...that.hiddenButtons,"update","detail"];
}
隐藏表格的某列
修改 that.table.hideColumns 数组的值, 里面是字段名
that.table.hideColumns.push("fd_aa");
控制表格上方清空文字右侧区域的内容
listBtn2(that){
  // 主要是修改这几个状态
  // tableHeadData: {
  //   show: false, // 是否展示
  //   loading: false, // 是否在加载中, 比如在接口pending时
  //   text: '', // 文本内容,可以为html字符串, 可以加颜色,加粗等
  // }

  that.tableHeadData = {
  	show:true,
    loading:true,
    text:''
  };

  setTimeout(()=>{
     that.tableHeadData = {
      show: true,
      loading: false,
      text: '<span style="color:red;font-weight:bold;">示例文本</span>',
    };
  },2000)
},
收起/展开隐藏的查询项
主要是修改that.toggleSearchStatus的值
listBtn3(that){
  that.toggleSearchStatus = !that.toggleSearchStatus
},
一些重要的内置对象和方法
that.loadsh: 访问 loadsh
that.dayjs: 访问 dayjs
Antd: 访问 antd 组件库,配合用于下面的 openModal 方法,可根据项目自行修改
// 访问列表的数据
listBtn4(that){

  // 访问lodash 一些数组对象辅助函数
  const sum = that.lodash.add(1, 2);

  // 访问dayjs 日期时间赋值函数
  const dateStr = that.dayjs().format('YYYY-MM-DD HH:mm:ss');

  // 访问列表的数据
  const list = that.table.dataSource.slice();

  // 访问列表的一些字典值
  const dictOptions = that.dictOptions;

  // 访问当前登陆用户信息, 其它一些信息把userInfo换成对应的属性名
  // token 登录TOKEN
  // username 用户名
  // nickname 昵称
  // departTreeList 系统部门树列表信息
  // userInfo 用户信息, 包含avatar,email,id,orgCode,phone,realname,sex,tenantId,username
  const userInfo = that.$store.getters.userInfo;

  console.log(sum, dateStr, list, dictOptions, userInfo);
  // 3 '2023-06-26 14:09:50'
},

// 访问表单的数据
formBtn1(that){

	// 访问接口返回的表单数据, 有ID,如果是新增,只有ID
  const data = that.model;

  // 访问当前表单时新增add/编辑edit/详情detail
  const formShowType = that.formShowType;

  // 访问当前表单填写的数据, 只是目前显示在表单上面的字段的值
  const formValues = that.form.getFieldsValue();

  // 给表单项赋值(作为单表时才有用, 不管分组不分组的字段)
  that.form.setFieldsValue({fd_sex:'2'});

  // 有关联表时, 访问所有的关联表
  const linkTables = that.linkTableArr;

  // 获取关联表是否激活过 是个对象,key是关联表名, value是true/false表示是否激活过
  const activedLinkTables = that.linkTableLoadedSuccess;

  // 获取某个关联表的引用 link_table_test2是关联表名,[0]固定写法 如果这个关联表没被激活过, 获取不到
  let linkTableRef;
  if(activedLinkTables.link_table_test2){
   linkTableRef = that.$refs.link_table_test2[0];
  }

  // 作为关联表时访问主表的数据
  let mainTableRef;
  if(that.linkTableRelationProp){
  	mainTableRef = that.linkTableRelationProp.mainTableRef;
  }

  console.log(data, formValues, linkTables, linkTableRef,activedLinkTables, mainTableRef);
}
发送请求
内置有 getAction,postAction,deleteAction,putAction,downloadFile, 可以直接在 js 增强中访问, 不用通过 that.xxx 其中 putAction 需要后台处理一下, 暂时可以通过 that.putAction 来访问
created(that){

  const data = { fd_a:22 };

	getAction('/get123', data); // 第二个参数会被拼接在url上
  postAction('/post123', data); // 第二个参数会被以JSON格式放到body里
  deleteAction('/delete123', data); // 第二个参数会被拼接在url上
  that.putAction('/put123', data); // 第二个参数会被以JSON格式放到body里
  downloadFile('/download123', /* fileName, params */); // filename是保存时的文件名,params拼接在url上

}
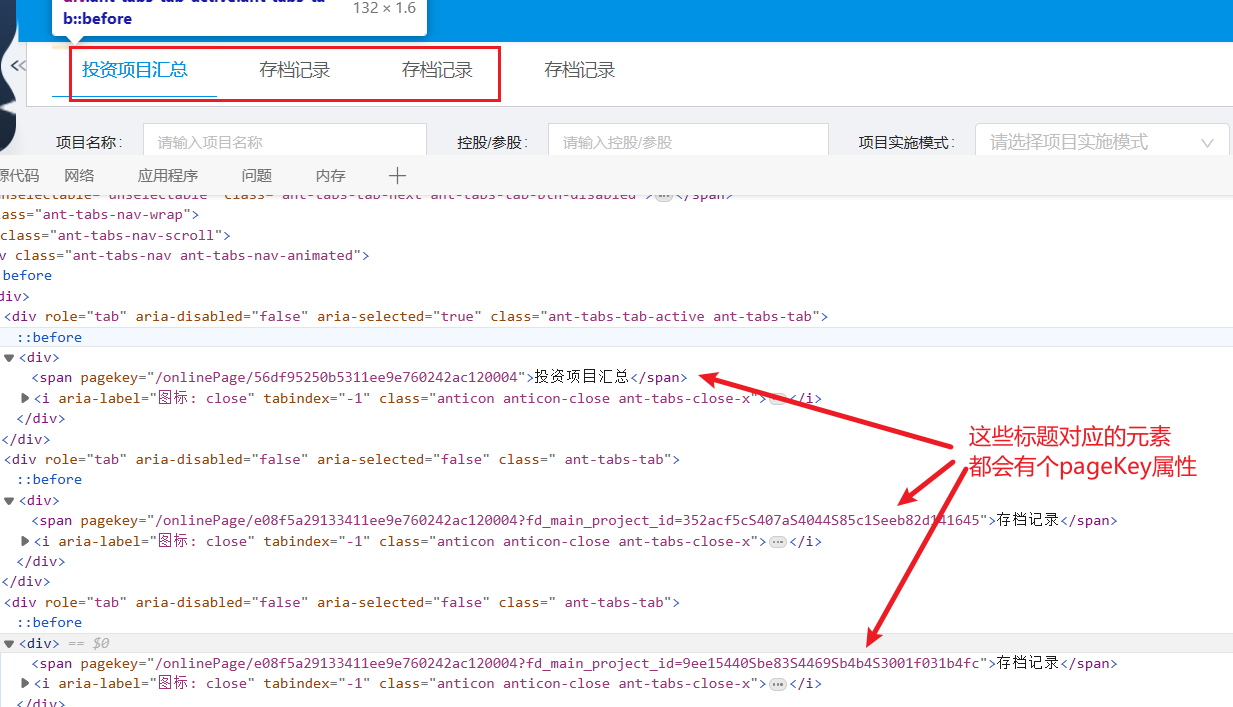
JS 增强修改 tab 页标题
系统之前更新过, 对于正常的一个页面, 会自动找到正确的标题,查找规则如下.
- 路由变化时候, 会根据 route.name 和 route.matched 来判断是否是动态路由
- 如果是常规路由, 会直接使用 route.meta.title 作为标题
- 如果是动态路由, 根据 fullPath 从接口返回的菜单树里面查找,找到就使用配置的菜单标题,没找到就使用 route.meta.title. 例如:在线表单和在线报表的功能测试页面, 如果配置了一个菜单就使用配置的标题,否则会显示新 online 表单入口页面
但是不适用于链接带有?xxx 查询项并且是动态的, 这时可以单独针对某个页面写 JS 增强修改下
created(that){
  // 判断当前页面是否是需要修改的页面
  const isCDJL = that.$route.query.fd_main_project_id !== undefined;
  if(isCDJL){
    const fullPath = that.$route.fullPath;
    // 使用CSS属性选择器, 查找标题元素并修改
    const titleEl = document.querySelector(`.content-wrapper span[pageKey="${fullPath}"]`);
    if(titleEl){
      titleEl.innerHTML='存档记录'
    }
  }
}
online 中跳转路由并且修改标题方法
新增的一个实验性方法pushRoute, 用于跳转路由并且修改标题, 用法如下
- 第一个参数是完整的路径,字符串
- 第二个参数是一个对象, 目前只有一个 title 属性, 用于修改标题
listBtn5(that){
	that.pushRoute("/onlinePage/7865c3f9bb2441ed8b31b1c930f085be?fd_name=123131", { title: "测试标题" });
}
JS 增强打开一些个性化的表单弹窗
内置有openModal和customInputModal和customConfirm三个方法
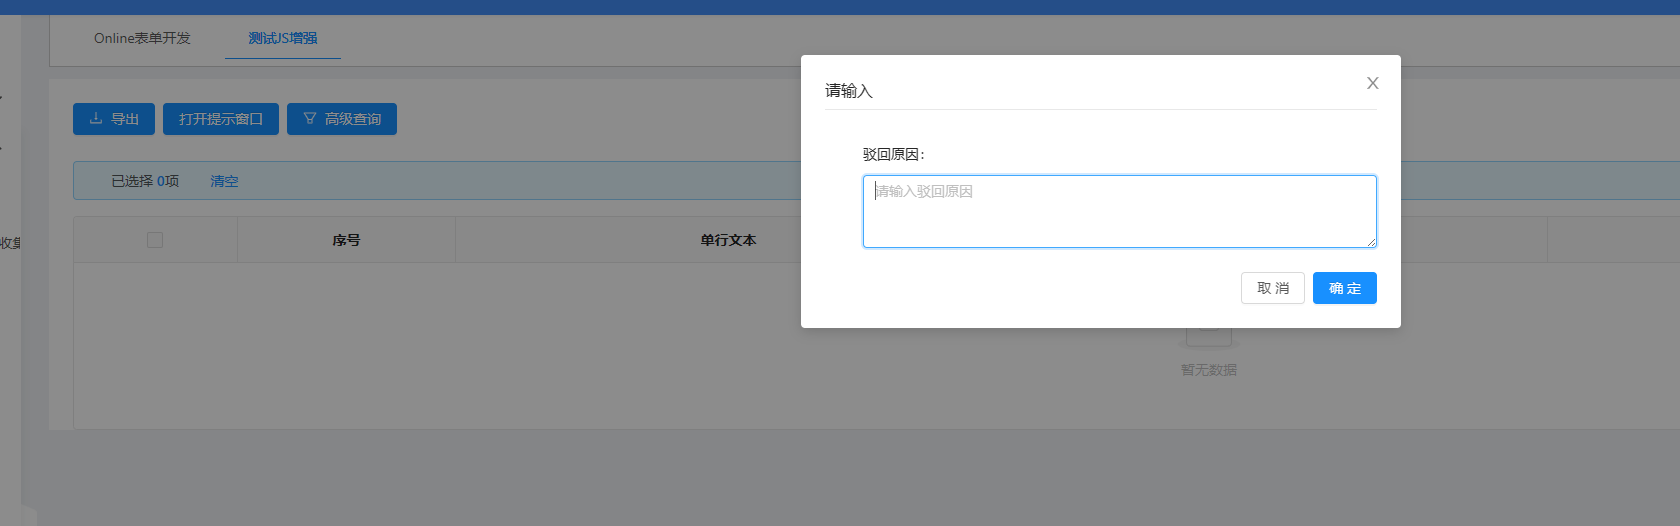
customConfirm(title,content): 打开一个确认弹窗, 参数 1:title,参数 2:content, 返回值为 Promise 对象, 可以在.then 回调里面书写确认后的逻辑.catch 回调中写取消的逻辑, 也可以在 async 函数中 await 之后写确认逻辑, tay catch 的 catch 中写取消的逻辑customInputModal(title = '请输入', label, isMultiLine, option = {}): 打开一个输入框弹窗, 参数 1:title,参数 2:表单项名称 label,参数 3:是否多行文本,参数 4:option(placeholder,labelCol,wrapperCol,width,colon,rules,defaultValue)均有默认值. 返回同样是个 Promise 对象, resolve 回调可以接收一个参数为输入的文本.openModal(option = {}): 打开一个弹窗,属于低级别功能,但是可以渲染任意效果, 需要自己写 渲染函数.链接:vue-渲染函数 链接:antdv-modal 参数为一个对象,type 属性可选[‘info’, ‘success’, ‘’, ’error’, ‘warning’, ‘confirm’]图标,剩余属性传递给 Modal.type() 函数.
customInputModal代码示例
  async cus_btn1(that){
    const value = await that.customInputModal("请输入", "驳回原因", true,{
      // 两种校验都能用, required是必填,如果是函数的话,参数是输入的值, 返回值是错误信息,没有返回值是校验成功
      // rules:[{required:true}],
      rules:[function validator(value){
              if(value !== '123'){
                return "请输入'拒绝'"
              }}],
      // 这个是默认值
      defaultValue:"不同意"
    });
    const msg = "驳回原因:" + value;
    console.log(msg)
  }
customConfirm代码示例
  async cus_btn2(that){
    try{
      const res = await that.customConfirm('提示','确定审核吗?');
      // await postAction('/api/xxx',res);
      console.log("确认审核:",res);
    } catch(e){
      console.log("取消审核:",e);
    } finally{
      console.log("操作完毕");
    }
  }

openModal代码示例
// 一段示例
beforeSubmit(that, formData) {
    const checklistTask = () => {
      if (formData.md_system_check) {
        formData.md_system_check = formData.md_system_check.map(v => {
          const item = { ...v }
          if (item.id && item.id.startsWith('row_')) {
            console.log('删除新插入检查项的ID', item)
            delete item.id
          }
          return item
        })
      }
    }

    // 这里需要修改onlineList.vue把Antd组件库的过呢据需要组件引入
    const {
      Form: { Item: FormItem },
      Input: { TextArea },
      Select,
    } = that.Antd

    const options = [
      {
        label: '修改基础信息',
        value: '1',
      },
      {
        label: '修改检查项',
        value: '2',
      },
    ]

    const recordTypeJSX = createElement => {
      return createElement(
        FormItem,
        {
          props: {
            label: '操作类型',
            labelCol: { span: 6 },
            wrapperCol: { span: 18 },
            required: true,
          },
        },
        [
          createElement(Select, {
            props: {
              options,
            },
            style: {
              width: '100%',
            },
            on: {
              change: value => {
                that.$set(that.openModalData, 'modifyType', value)
              },
            },
          }),
        ]
      )
    }

    const recordReasonJSX = createElement => {
      return createElement(
        FormItem,
        {
          props: {
            label: '操作说明',
            labelCol: { span: 6 },
            wrapperCol: { span: 18 },
            required: true,
          },
        },
        [
          createElement(TextArea, {
            props: {
              placeholder: '如: 添加 登录密码检查项',
            },
            on: {
              input: event => {
                const value = event.target.value
                that.$set(that.openModalData, 'modifyReason', value)
              },
            },
          }),
        ]
      )
    }

    return new Promise((submitResolve, submitReject) => {
      that.openModal({
        title: '请记录操作原因',
        type: 'confirm',
        width: 500,
        content: createElement => {
          return createElement(
            'div',
            {
              class: {
                'form-item-wrapper': true,
              },
            },
            [recordTypeJSX(createElement), recordReasonJSX(createElement)]
          )
        },
        onOk() {
          return new Promise((resolve, reject) => {
            const { modifyReason, modifyType } = that.openModalData

            if (!modifyReason || !modifyType) {
              // submitReject("请检查是否填写完整"); // 不要调用,
              that.$message.error('请检查表单是否填写完整')
              reject() // 弹窗不关闭
              return
            }

            // 新增的时候就没有关联表数据, 不查询,直接插入
            if (!formData.id) {
              let originRecords = []
              originRecords.push({
                fd_trans_type: modifyType,
                fd_remark: modifyReason,
                fd_system_id: formData.fd_top,
              })
              formData.md_system_check_trans = originRecords

              resolve() //关闭弹窗
              checklistTask() // 去除检查项列表自动生成的id字段
              console.log('提交数据:', formData)
              submitResolve(formData) // 提交
              return
            }

            // 调取接口获取操作记录
            postAction('/online/cgform/api/linkform/many', {
              linkId: 'ce5597882411cd760e5382357d4c3265',
              value: formData.id,
              linkFieldName: 'fd_sys_dec_id',
            })
              .then(res => {
                if (!res.success || !res.result) {
                  that.$message.error('获取操作记录失败:', res.message)
                  submitReject() // 阻止提交
                  return
                }

                // 获取原有的操作记录表, 并且自动插入一条
                let originRecords = res.result.recordes || []
                originRecords.push({
                  fd_trans_type: modifyType,
                  fd_remark: modifyReason,
                  fd_system_id: formData.fd_top,
                })
                formData.md_system_check_trans = originRecords

                resolve() //关闭弹窗
                checklistTask() // 去除检查项列表自动生成的id字段
                console.log('提交数据:', formData)
                submitResolve(formData) // 提交
              })
              .catch(err => {
                console.error(err)
                that.$message.error('获取操作记录失败:', err.message)
              })
          })
        },
        onCancel: () => {
          submitReject() // 阻止提交
        },
      })
    })

}

隐藏表单某个字段
loaded(that){
  that.sh.fd_name = false;
  that.sh.fd_age = false;
}
修改表单下拉框选项
对一个下拉框先配置一个字典 code,之后在表单 JS 增强中动态获取数据,然后修改下拉框的选项
async loaded(that,{data,type}){

  const options = [{label:'示例1',value:'1'}, {label:'示例2',value:'2'}];

  // 获取表单项
  const fd_sex = that.allFormItems['fd_sex'];
  // 每个表单项都有个 setWidgetAttrs 方法,可以直接设置针对UI组件的一些属性, 如:select的options prop
  fd_sex.setWidgetAttrs({
  	options
  })
},
隐藏某个关联表
在主表的表单的 JS 增强中定义
loaded(that){
  const linkTable = that.linkTableArr.slice();
  // 找到某个关联表的下表
  const xjxz_index = linkTable.findIndex(
    (v) => v.linkTableName === "uv_bus_enquiry_expert"
  );
  // 价格
  const price = that.model.fd_budget;
  // 根据判断隐藏这个关联表
  if (isInfoChangeBtn && price <= 200000) {
    linkTable[xjxz_index].show = false;
  }
  that.linkTableArr = linkTable;

  // 隐藏主表的提交按钮
  that.customButtonOrderList = that.customButtonOrderList.filter(
    (v) => v.key !== "form-submit"
  );
}
隐藏一对多关联表区域
在主表的表单的 JS 增强中定义
const listProps = {
  hideSearch: true, // 隐藏/显示 查询区域
  hideActionColumn: true, // 隐藏/显示 表格操作列
  hideActionColumnButShowDetail: true, // 隐藏表格操作列,但是显示详情按钮
  hideTableSelect: true, // 隐藏/显示 表格选择框
  hideToolbar: true, // 隐藏/显示 工具栏(新增,导入,导出)
};
// 设置关联表表名为:uv_bus_enquiry_supplier$05的列表属性
that.$set(that.linkTableNHiddenProps, "uv_bus_enquiry_supplier$05", {
  ...listProps,
});
隐藏表单的确定按钮
loaded(that){
  // 隐藏主表的提交按钮
  that.customButtonOrderList = that.customButtonOrderList.filter(
    (v) => v.key !== "form-submit"
  );

}
感谢您的反馈。如果您有关于如何使用 KubeSphere 的具体问题,请在 Slack 上提问。如果您想报告问题或提出改进建议,请在 GitHub 存储库中打开问题。
 上一篇
上一篇
